Go에서 쓰레드간 데이터 공유시, Channel과 Mutex의 속도 비교

Don’t communicate by sharing memory; share memory by communicating.

라길래, channel과 mutex의 성능을 알아봤다.

테스트 머신은 Xeon CPU가 두 개 달렸고, 12G의 램을 가지고 있다. 각 CPU당 6개의 코어가 있으므로, 하이퍼쓰레딩을 이용하여 최대 24개의 코어를 사용할 수 있다.

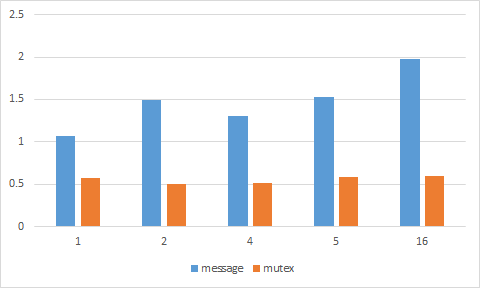
테스트는 channel을 사용하는 경우와 mutex를 사용하는 경우로 나눴으며, 10번의 결과를 평균내어 최종 결론을 만든다.

아래의 그래프가 그 결과로, 사용하는 코어의 개수와 관계없이 channel을 사용하는 것이 mutex를 사용하는 것보다 느리다는 것을 알려준다.

추가로 테스트 한 바, channel의 크기를 변경하는 것은 결과에 별다른 영향을 미치지 못한다.

golang_comapre_message_mutex

Go로 프로그래밍 할 경우, channel을 사용할지 mutex를 사용할지에 대한 조언은 여기에 좀 더 자세히 나와있다.
hiredis for Windows

Redis is simple but powerful memory-based key/value DB and it supports various programming languages. As it is like a dark horse of web, you can easily find any of its drivers for popular web programming languages. But, if you don’t write code for web and use C/C++, don’t worry! They have official C client library called hiredis also.

As you expected, of course, it works well if you are under Linux-based machine. The problem is hiredis does not support Windows compile by itself. So, you have to port its source code to Windows, huh?

Right, it’s not a good idea and not even easy for ordinary C/C++ programmer. You may think you can find some with googling. Okay, here’s my story.

I’m a game server programmer and decided to use Redis for my game. Because I had an experience with hiredis on my Mac, I didn’t expect I will spend such a long time for that – almost a whole work day.

Firstly, as other programmers usually do, I’ve googled about hiredis for windows compile and got the link. Even though the project was a little bit old, it’s under control by Microsoft! I’ve just kept following blog instruction and it worked in some wise. But, as Microsoft’s hard situation, it vomited tons of link errors I could not solve easily, while testing pub/sub functionality. I consumed most of my time to figure it out and almost gave up, almost.

At that moment, by chance, I thought about Node.js. If I google ‘hiredis windows’, the top most result is ‘hiredis – npm’. Node.js is built by C++ and I could get some clue from it. If I followed the link and there was Eldorado!

Windows

Dmitry Gorbunov (@fuwaneko) made a fork of hiredis-node with Windows support.

That fork works clearly + perfectly! No additional code is needed at all. Pub/sub works nicely, too. Node saved my life and everybody live in peace.

That’s how could I find Eldorado for a whole work day. If you encounter above situation, just ignore MSOpenTech and give your hands to Node.

C++로 만든 라이브러리를 C#에서 사용하기 2

최근에 잠깐 C++/CLI에 대해서 살펴볼 일이 있어서, 무려 4년적에 적었던 ‘C++로 만든 라이브러리를 C#에서 사용하기‘를 살펴봤다.

당시와는 달리, 검색하면 관련된 내용을 찾기가 수월해진 것 같다. C++/CLI가 사용되는 경우가 늘었나 라고 생각했지만, VS2010에서 CLR프로젝트의 자동완성 기능은 제대로 동작하지 않는다. 스마트 기기류에 대응하느라 바쁜 Microsoft라 여기까지 신경 쓸 여력은 없나 보다.

일전의 설명만으론 부족한 부분을 보충하기위해 테스트코드를 만들었다.

Visual Studio 2010을 사용했으며, 솔루션의 구성은 다음과 같다.

LibAdder C++ 라이브러리
TestLibAdder LibAdder 테스트
LibAdderCS LibAdder의 인터페이스를 ManagedCode로 감싸주는 C++/CLI 라이브러리
TestLibAdderCS LibAdderCS 테스트

즉, LibAdder(C++) -> LibAdderCS(C++/CLI) -> TestLibAdderCS(C#) 이다.

예제파일은 github 에서 받을 수 있다.

참조사이트1(Managed String을 Unmanaged String으로 변환하기)
참조사이트2(델리게이트를 함수포인터로 변환하기)

코딩 인터뷰 완전 분석 215쪽 고난이도 연습문제 18.10(알고리즘 이벤트 마지막 문제)

이번 문제는 같은 길이의 단어로 구성되어있는 사전에서, 한 단어에서 다른 단어로 한 글자씩 바꿔가며 변형해 나가는 과정을 알아내는 것이 과제이다.

심화문제에서 최단/최장 경로를 구하는 것까지 나와서, 처음에는 사전 데이터를 그래프로 구성하려고 했다. 그러면 기존의 알고리즘을 이용해 경로를 찾아내기 수월할 테니. 그러나, 수천 개에 달하는 사전데이터를 그래프로 구성하는데 예상보다 시간이 많이 걸렸고, 이걸 최적화 해보겠다고 삽질하다가, 방법을 선회해야만 했다.

1. 미리 존재하는 파일로부터 사전을 구성한다. read_dic/1
2. 주어진 단어 A, B로 부터 중간단어를 하나씩 구한다. replace_word/3
3. 중간단어가 사전에 존재하는지 확인하고, 존재한다면 결과에 저장하고 그렇지 않으면 다음 순서의 중간단어를 구해서 2의 과정을 반복한다. find_path/6
4. 마지막의 중간단어가 B와 동일하면 경로를 구한 것이고, 그렇지 않으면 해당하는 경로가 존재하지 않는 것이다.
5. 단어 A, B의 길이가 다르면, word_length_mismatch를 반환하고, 4자리나 5자리 단어가 아니면, no_dictionary_exist를 반환한다. find_path/2
6. 각 사전은 word4.txt와 word5.txt로 존재한다고 가정한다.

출력예

74> insight:find_path("wean", "zein").
["wean",impossible]
75> insight:find_path("damp", "like").
["damp","dame","dime","dike","like"]
76> insight:find_path("damp", "damp2").
word_length_mismatched
77> insight:find_path("damp", "damp"). 
["damp"]

코딩 인터뷰 완전 분석 210쪽 17.3 변형 문제(알고리즘 코딩 이벤트 2주차 문제)

문제는 인사이트의 블로그에서 확인할 수 있듯이,
팩토리얼(!)의 결과값에서, 마지막에 연속되는 0의 개수와 0이 아닌 첫번째 숫자를 알아내는 것이다.

사실, 이전 문제를 낑낑대며 풀고, 다른 사람들의 풀이 법을 보니, 완전 삽질했구나 싶었다. 더구나 이미 얼랭을 사용한 사람이 있다니…OTL

그러나 이건 좀 쉽다! 한 15분 걸린 것 같다. Erlang도 조금 익숙해 졌고…

1. 팩토리얼식의 각 값을 순차적으로 곱한다. last/1
1.1 1의 과정 중, 마지막 0의 수를 세어 누적한다. countzero/1
1.2 1의 과정 중, 0이 아닌 마지막 수를 다음 곱셈에 사용하고, 나머지 숫자는 버린다.

출력예

Eshell V5.9.1  (abort with ^G)
1> c(insight2).
{ok,insight2}
2> insight2:last(1).
{0,1}
3> insight2:last(10).
{2,8}
4> insight2:last(100).
{24,6}
5> insight2:last(2012).
{490,2}
6> insight2:last(10000).
{2444,2}
7> 

문제로 풀어보는 알고리즘 149쪽 문제 3.c 풀이(알고리즘 코딩 이벤트 1주차 2번째 문제)

구독하던 인사이트 출판사 블로그에서 이벤트를 하는 것을 발견하고, 간만에 알고리즘 문제에 도전~

문제는 블로그에서 확인할 수 있듯이, 주어진 집합을 하나이상의 집합으로 나누는 모든 방법을 출력하는 것이다.

뭔가, 효율적으로 이를 구하는 방법이 존재할 것 같아서 계속 고민해 봤으나, 원초적인 알고리즘을 만드는 일을 수학자가 할 일이라고 생각해서, 그냥 딱 떠오르는 방법으로 코딩 해 버렸다.

1. 입력 받은 N으로 리스트를 집합을 구한다. makelist/1
2. 1에서 만든 집합에서, 가능한 모든 부분집합을 구한다. subsets/1
3. 2에서 구한 부분집합의 조합 중, 각 원소가 한 개씩만 존재하는 조합만 고른다. combinations/1

평소 사용하던 언어로 하는 것은 시시할 것 같아, 도무지 사용할 일이 없을 것 같았던 Erlang으로 시도. 머리가 더 아팠다.

출력예

1> c(insight).
{ok,insight}
2> insight:combinations(3).
[[0],[1],[2]]
[[0,1],[2]]
[[0,2],[1]]
[[0],[1,2]]
[[0,1,2]]
ok
3> insight:combinations(4).
[[0],[1],[2],[3]]
[[0,1],[2],[3]]
[[0,2],[1],[3]]
[[0],[1,2],[3]]
[[0,1,2],[3]]
[[0,3],[1],[2]]
[[0],[1,3],[2]]
[[0,1,3],[2]]
[[0],[1],[2,3]]
[[0,1],[2,3]]
[[0,2,3],[1]]
[[0,2],[1,3]]
[[0,3],[1,2]]
[[0],[1,2,3]]
[[0,1,2,3]]
ok
4>

중요: Erlang은 인사이트의 책으로 처음 배웠다.

C++ 문자열 나누기

Ruby에도 C#에도 문자열에 대한 split함수가 있다. 그러나 우리의 C++에는 그런 게 없다. 이런 하잖은 기능은 직접 구현해야 한다. 이게 C++이 멋진 이유 아니겠나.

서핑 중, 문자열을 자르는 아주 멋진 코드조각을 stackoverflow에서 발견했다.

vector<string> tokens;

copy(istream_iterator<string>(iss),
    istream_iterator<string>(),
     back_inserter<vector<string> >(tokens));

구차하게 for문을 작성하지 않아도 되는 이런 우아한 방법이 있다니. 쇼크! 내가 얼마나 STL에 무신경했는지 느꼈다.
한눈에 들어오지 않아서 Visual C++ 2005의 STL소스를 참조해서 살펴봤다.

알다시피, copy()함수는 첫 번째 인자로 들어오는 입력 이터레이터를 두 번째 인자로 들어오는 입력 이터레이터까지 순회하면서 그 값을 세 번째 인자인 출력 이터레이터의 위치에 쓴다. back_inserter클래스는 컨테이터에 값을 추가하기 위한 일종의 헬퍼이다.

여기서 내가 가장 헛갈렸던 것은, ‘첫 번째 인자와 두 번째 인자의 값을 비교함에 있어서 istream_iterator는 그 값을 어떻게 가져오며, 비교대상인 istream_iterator클래스의 기본 생성자(두 번째 인자)는 무슨 의미인가’였다.

Visual C++의 STL소스를 뒤져보면, istream_iterator클래스의 기본생성자는 문자열의 char(istream_iterator클래스 기본 템플릿 파라미터)을 가리키는 포인터 변수를 0으로 설정한다. 즉, 종료문자열을 의미한다.

istream_iterator()
: _Myistr(0)
{	
    // construct singular iterator
}

그렇다면, copy()함수는 입력 이터레이터의 값을 어떻게 가져올까? 이는 istream_iterator클래서의 _GetValue()함수를 사용하며, _GetValue()함수는 basic_istream클래서의 >>연산자를 사용한다. 결국, copy()함수는 istringstream클래스에 정의된 >>연산자를 사용하게 된다.

자못 복잡해 보일 수도 있지만, 코드는 아름답다.

여기서 한 걸음 더 나아가서 delimiter를 공백문자가 아닌 다른 걸로 바꾸고 싶었다. istringstream에서는 그러한 능력을 제공하지 않는다. 역시 C++답다. split()함수를 구현하지 않은 마당에, delimiter를 설정하는 것 따위, C++에게는 사치다. 근데, getline()함수에서는 delimiter를 설정할 수 있다. 결국, 다음과 같이 쓸 수 있다.

for (string token; getline(iss, token, 'i'); tokens.push_back(token));

어쨌든, 한 줄은 한 줄. – -;

교훈 : STL소스는 복잡하다.

실행중인 인터넷 익스플로어 제어하기

이거, 간단치 않았던 작업이다. 열려있는 인터넷 익스플로어(이하 IE)를 제어해야 했다. 하다 보니, 이런걸 요청 받기도 하고 또, 겨우겨우 구현하기도 한다. 최단로(路)인지는 모르겠지만, 어쨌든 길은 길이다.

IE::_FindWindow(const TCHAR* tszSubWindowText)는 IE의 윈도우타이틀을 검색해서 핸들을 구한다. IE::Back()함수와 IE::Navigate()함수는 모두 윈도우 핸들을 찾기 위한 윈도우 타이틀을 인자로 요구하며, 각각, IE의 뒤로 가기와 URL이동을 구현한다.

이 코드는 oleacc.lib가 필요하며, Window XP에서 테스트 되었다.

근데…, 이걸 어디에 쓰냐고?

쓸 데가 있더이다~

Reading Excel using Ruby

There’re some libraries dealing with Excel, but they didn’t work in some conditions. So I’ve just written the code for this.

ExcelData uses win32ole module. It means this work only on Windows and Excel needs to be installed.
There’s only a public class method Load returns row array. Each row consists of hash with column name and value string pair.
Load method requires minimum three parameters. Excel filename(excelFilename), sheet name(worksheetName) and first header column name(firstHeaderColumnName). ExcelData finds first row with first header column name and read cell from there. If empty cell is found(both row and column), it stops reading the file.

require 'win32ole'

class ExcelData
public
  def	ExcelData.Load(excelFilename, worksheetName, firstHeaderColumnName, keySearcher = nil)
    xls       = nil
		ws        = nil
    excelData = []

    begin
      xls         = WIN32OLE.new('Excel.Application')
      xls.visible = false
      ws          = xls.Workbooks.Open(excelFilename).Worksheets(worksheetName)

      excelData   = _CollectData(ws, firstHeaderColumnName, keySearcher)
    rescue
      puts "Failed to open excel file : #{excelFilename}"
    ensure
      xls.quit if xls != nil
    end

    return excelData
  end

private
  def	ExcelData._FindFirstDataRowNum(worksheet, firstHeaderColumnName)
    rowNum  = 1

    while (true)
      row = worksheet.Range("a#{rowNum}")
      break if (row['Value'] != nil && row['Value'] == firstHeaderColumnName)
      rowNum  += 1
    end

    return rowNum + 1
  end
	
  def	ExcelData._FindLastDataRowNum(worksheet, firstDataRowNum)
    rowNum  = firstDataRowNum

    while (true)
      row = worksheet.Range("a#{rowNum}")
      break if (row['Value'] == nil || row['Value'] == "")
      rowNum  += 1
    end

    return rowNum - 1
  end

  def	ExcelData._FindLastDataColChar(worksheet, headerDataRowNum)
    colChar	= 'a'

    while (true)
      row = worksheet.Range("#{colChar}#{headerDataRowNum}")
      break if (colChar == 'z' || row['Value'] == nil || row['Value'] == "")
      colChar.succ!
    end

    return colChar
  end

  def ExcelData._CollectData(worksheet, firstHeaderColumnName, keySearcher)

    firstDataRowNum = _FindFirstDataRowNum(worksheet, firstHeaderColumnName)		
    lastDataRowNum  = _FindLastDataRowNum(worksheet, firstDataRowNum)
    lastDataColChar = _FindLastDataColChar(worksheet, firstDataRowNum - 1)

    puts "Collecting excel data : Total #{lastDataRowNum - firstDataRowNum + 1} rows ..."

    # Column Names
    colNames	= []
    row = worksheet.Range("a#{firstDataRowNum - 1}:#{lastDataColChar}#{firstDataRowNum - 1}")
    row.each do |cell| colNames << cell['Value'] end

    # Collect excel data
    excelData	= []
    for rowNum in firstDataRowNum..lastDataRowNum
      colIndex  = 0
      rowHash   = {}

      row = worksheet.Range("a#{rowNum}:#{lastDataColChar}#{rowNum}")

      row.each do |cell|
        if (!cell['Value'].to_s.empty? && cell['Value'].to_s =~ /^[0-9.]+/)
          rowHash.store(colNames[colIndex], cell['Value'].to_i.to_s)
        elsif
          rowHash.store(colNames[colIndex], cell['Value'].to_s)
        end

        colIndex	+= 1
      end

      excelData << rowHash

      keySearcher.store(rowHash[colNames[0]].to_s, excelData.length - 1) if keySearcher != nil

      print "." if excelData.length % 10 == 0
    end

    puts 

    return excelData
  end
end

You can simply use this code like bellow.

xls = ExcelData.Load('myfile.xls', 'sheet1', 'ITEMID')

Critical Section Block 2

이전 포스트에서 CSBLOCK 매크로를 사용해서 좀 더 간편하게 크리티컬 섹션을 정의할 수 있도록 했었다. 이에 조금 덧붙여서, 어떤 데이터형이든지, 그에 대응하는 크리티컬 섹션 변수를 만들어 줄 수 있도록 하고 싶었다. 이 작업도중 Variadic macro to count number of arguments을 읽게 되었고, 옳타구나 하고 여러 개의 자료형을 매크로의 파라미터로 사용할 수 있도록 수정했다.

다음은 이 아이디어를 구현한 코드이다.

locker 클래스는 주소값에 대응하는 값(이 코드에서는 int형 key를 사용했지만, 윈도우의 크리티컬 섹션을 위해서는 CRITICAL_SECTION 타입의 변수가 될 것이다)을 등록/삭제/검색 한다.

class locker
{
public:
    locker()
    : _key(0)
    {}

    ~locker()
    {
        map<unsigned int, int>::iterator    itr, itrend;
        itr     = _users.begin();
        itrend  = _users.end();
        for (; itr != itrend; ++itr)
        {
            unregister_addr((void*)itr->first);
        }
    }

    int register_addr(void* address)
    {
        map<unsigned int, int>::iterator    itr = _users.find((unsigned int)address);
        if (itr != _users.end())    return itr->second;

        cout    << "register: " << hex << (unsigned int)address << endl;
        _users[(unsigned int)address]   = ++_key;

        return _key - 1;
    }

    int unregister_addr(void* address)
    {
        int key = 0;
        map<unsigned int, int>::iterator    itr = _users.find((unsigned int)address);
        if (itr == _users.end())    return key;

        key = itr->second;

        cout    << "unregister: " << hex << (unsigned int)address << endl;
        _users.erase((unsigned int)address);

        return key;
    }

    int key(void* addr)
    {
        map<unsigned int, int>::iterator    itr = _users.find((unsigned int)addr);
        if (itr == _users.end())    return 0;

        return itr->second;
    }

private:
    map<unsigned int, int>  _users;
    int             _key;
};// class locker

이 클래스에는 약간의 문제가 있는데, _users, _key 변수 역시 크리티컬 섹션이라는 점이다. 따라서 이에 대한 처리도 필요하다. 또한, 주소값에 대한 key를 동적으로 생성하는데 대한 성능상의 문제도 존재한다. 그렇지만, 어디까지나 이는 아이디어를 구현하기 위한 과정으로 판단해서 일단 패스. :)

scope_lock_args 클래스는 CSBLOCK 매크로가 여러 개의 인자를 받을 수 있도록 해준다.

class scope_lock_args
{
friend class scope_lock;
public:
    scope_lock_args(int count, ...)
    {
        va_list addresses;
        va_start(addresses, count);

        for (int i = 0; i < count; ++i)
            _addresses.insert(va_arg(addresses, void*));

        va_end(addresses);
    }

    typedef std::set<void*> data_type;
private:
    std::set<void*> _addresses;
};// class scope_lock_args

scope_lock 클래스의 생성자와 소멸자에서 크리티컬 섹션의 시작과 종료를 알린다. 각 데이터는 scoke_lock_args 클래스가 주소에 따라 정렬해서 관리하기 때문에 항상 같은 순서로 락을 걸고 풀 수 있다.

class scope_lock
{
public:
    scope_lock(scope_lock_args arg)
    : _arg(arg)
    {
        scope_lock_args::data_type::iterator    itr, itrend;
        itr     = _arg._addresses.begin();
        itrend  = _arg._addresses.end();
        for (; itr != itrend; ++itr)
        {
            _locker.register_addr(*itr);
            cout    << "scope_lock::scope_lock " << hex << *itr << endl;
            // EnterCriticalSection
        }
    }

    ~scope_lock()
    {
        scope_lock_args::data_type::reverse_iterator    itr, itrend;
        itr     = _arg._addresses.rbegin();
        itrend  = _arg._addresses.rend();
        for (; itr != itrend; ++itr)
        {
            cout    << "scope_lock::~scope_lock " << hex << *itr << endl;
            // LeaveCritialSection
        }
    }

    operator bool() const
    {
        return true;
    }

private:
    static locker   _locker;
    scope_lock_args _arg;
};// class scope_lock

locker  scope_lock::_locker;

하일라이트. CSBLOCK는 최소 하나부터 최대 세 개까지의 데이터를 인자로 받을 수 있다. 물론, 필요하면 늘릴 수 있다.

#define CSBLOCK(...)    CSBLOCK_IMPL(__VA_ARGS__, 3, 2, 1)
#define CSBLOCK_IMPL(_1, _2, _3, N, ...)    if (scope_lock __sl = scope_lock_args(N, _1, _2, _3))

이제는 CSBLOCK 매크로에 여러 개의 인자를 넣을 수 있고, 그 순서에 상관없이 항상 같은 순서로 락을 사용한다.

#include <iostream>
#include <map>
#include <set>
#include <cstdarg>

using namespace std;

int main()
{
    int k   = 0;
    int l   = 0;

    CSBLOCK(&k)
    {
        cout    << "<1>" << endl;
        CSBLOCK(&l, &k)  // 순서 상관 없음
        {
            cout    << "<2>" << endl;
        }

        CSBLOCK(&k)
        {
            cout    << "<3>" << endl;
        }

        CSBLOCK(&k, &l)  // 순서 상관 없음
        {
            cout    << "<4>" << endl;
        }
    }

    return 0;
}

성능상의 문제로 실제로 사용하기에는 많은 개선이 필요하겠지만, 꽤 매력적이지 않나? ㅋㅋㅋ
C++은 확실히, 이런 것들이 재미있는 것 같다.